During the last AVD TechFest I promised to release the code to deploy Azure Virtual Destkop using Terraform. This is part 1 of a series of posts about this topic.
In this blogpost I’ll cover the following topics:
- Explain Terraform and the basic Terraform files and modules
- Explain the Terraform modules for several AVD components
- Deploy AVD modules using Visual Studio Code
Explain Terraform and the basic Terraform files and modules
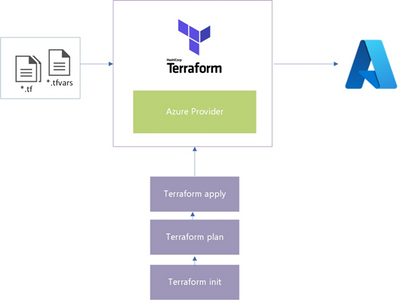
Terraform is a scripting language that is not restricted to Azure. You can use it to deploy resources to AWS and Google Cloud. The difference is the code is in the terminology.
To deploy resources to Azure you need to define your provider in your terraform files.
provider "azurerm" {
  features {}
}
For each resource that you want to deploy using Terraform there is a specific syntax to use. In the following example you can see the syntax for creating an Azure resource group.
resource "azurerm_resource_group" "avd-sa"You first say that you want to create a resource group and between “**” you put a name. This is not the name of the resource in the Azure portal. This is a name that is used in the script to reference this object.
With Terraform you need a couple of different files to deploy the resources.
- main.tf
- variables.tf
Main.tf file
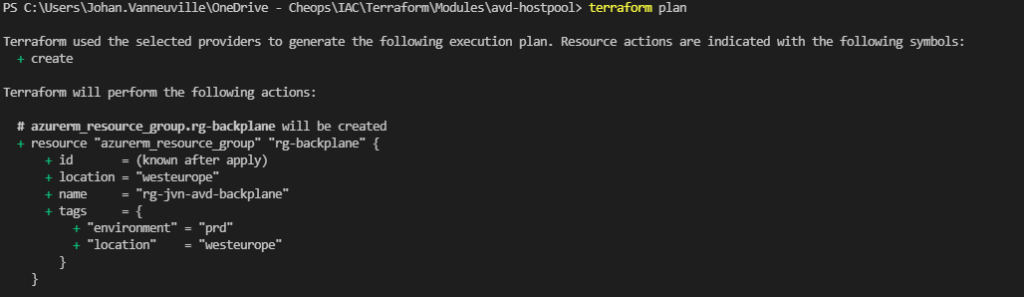
In the main.tf files you configure the resources with all the parameters you want. Below you can find a example of a resource group for the AVD backend. You can see that I’m using a variable with the value “prefix”. In this case this is the customer shortname. In this example I also assign some tags to the resource group.
resource "azurerm_resource_group" "rg-backplane" {
  name     = "rg-${var.prefix}-avd-backplane"
  location = var.location
  tags = {
    "location" = "westeurope"
    "environment" = "prd"
  }
Variables.tf file
The next type of file we need is the variables file. In this file you declare items that you want to adjust very quickly. Like for example the customer shortname and the location of the resource.
variable "location" {
  description = "(Required) location where this resource has to be created"
  default = "westeurope"
}
variable "prefix" {
    description = "customer prefix"
    default = "jvn"
}
Terraform modules
The next step is the process is to explain Terraform modules. A module is a block of code that you can use in a bigger deployment. To use a module in Visual Studio Code you need to create your folders in a specific manner.

Explain the Terraform modules for several AVD components
In this section I’ll explain how to create Terraform modules for AVD. I created the following file structure.
Example: Terraform/Modules/AVD-Backplane
In this example I put all the resources that are needed to deploy the hostpool, app group and workspace in the AVD-Backplane module.
My default deployment for AVD consists of the backplane, storage and shared image gallery for my image. The network is part of my hub-spoke vnet deployment so I won’t cover it in this blogpost.
AVD-Backplane Module
In this module I deploy the hostpool, desktop app group and workspace. I also already create a resource group for the session host.
provider "azurerm" {
  features {}
}
##Create AVD Backplane Resource Group
resource "azurerm_resource_group" "rg-backplane" {
  name     = "rg-${var.prefix}-avd-backplane"
  location = var.location
  tags = {
    "location" = "westeurope"
    "environment" = "prd"
  }

}
##Create AVD Session Hosts resource Group
resource "azurerm_resource_group" "rg-sessionhosts" {
  name     = "rg-${var.prefix}-avd-session-hosts"
  location = var.location
  tags = {
    "location" = "westeurope"
    "environment" = "prd"
  }
}
resource "time_rotating" "wvd_token" {
  rotation_days = 30
}

#Create WVD workspace
resource "azurerm_virtual_desktop_workspace" "ws" {
  name                = "${var.prefix}-avd-ws"
  resource_group_name = azurerm_resource_group.rg-backplane.name
  location            = azurerm_resource_group.rg-backplane.location
  friendly_name       = "avd Workspace"
  description         = "avd workspace"
}

# Create WVD host pool
resource "azurerm_virtual_desktop_host_pool" "hp" {
  resource_group_name      = azurerm_resource_group.rg-backplane.name
  name                     = "${var.prefix}-hp"
  location                 = azurerm_resource_group.rg-backplane.location
  validate_environment     = true
  start_vm_on_connect      = true
  custom_rdp_properties    = "audiocapturemode:i:1;audiomode:i:0;targetisaadjoined:i:1;"
  type                     = "Pooled"
  maximum_sessions_allowed = 16
  load_balancer_type       = "BreadthFirst" #[BreadthFirst DepthFirst]
  friendly_name            = "AVD HostPool"
  tags = {
    "image" = "february"
    "location" = "westeurope"
    "environment" = "prd"
  }

  registration_info {
    expiration_date = time_rotating.wvd_token.rotation_rfc3339
  }
}

# Create WVD DAG
resource "azurerm_virtual_desktop_application_group" "fd" {
  resource_group_name = azurerm_resource_group.rg-backplane.name
  host_pool_id        = azurerm_virtual_desktop_host_pool.hp.id
  location            = azurerm_resource_group.rg-backplane.location
  type                = "Desktop"
  name                = "fd-${var.prefix}-avd"
  friendly_name       = "AVD Full Desktop"
  description         = "AVD Full Desktop"
  depends_on          = [azurerm_virtual_desktop_host_pool.hp]
}

# Associate Workspace and DAG
resource "azurerm_virtual_desktop_workspace_application_group_association" "example" {
  application_group_id = azurerm_virtual_desktop_application_group.fd.id
  workspace_id         = azurerm_virtual_desktop_workspace.ws.id
}
AVD Storage Module
In this module I’ll deploy an Azure Storage Account with 2 files shares. 1fileshare for FSLogix and 1 for MSIX App Attach.
provider "azurerm" {
  features {}
}

## Create a Resource Group for Storage
resource "azurerm_resource_group" "avd-sa" {
  location = var.location
  name     = "rg-${var.prefix}-avd-storage"
}

## Azure Storage Accounts requires a globally unique names
## https://docs.microsoft.com/en-us/azure/storage/common/storage-account-overview
## Create a File Storage Account
resource "azurerm_storage_account" "avd-sa" {
  name                     = "${var.prefix}avdsa"
  resource_group_name      = azurerm_resource_group.avd-sa.name
  location                 = azurerm_resource_group.avd-sa.location
  account_tier             = "Premium"
  account_replication_type = "LRS"
  account_kind             = "FileStorage"
  tags = {
    "location" = "westeurope"
    "environment" = "prd"
  }
}

resource "azurerm_storage_share" "fslogix" {
  name                 = "fslogix"
  storage_account_name = azurerm_storage_account.avd-sa.name
  depends_on           = [azurerm_storage_account.avd-sa]
  quota = "1024"
}

resource "azurerm_storage_share" "msix" {
  name                 = "msix"
  storage_account_name = azurerm_storage_account.avd-sa.name
  depends_on           = [azurerm_storage_account.avd-sa]
  quota = "1024"
}
AVD Shared Image Gallery Module
With AVD you can choose to use an image from the market place. If you choose to build your own image than the Shared Image Gallery is something you can use. In this module I’ll show you how to deploy it. After you deploy it you still need to use the Azure Image Builder to create your image.
provider "azurerm" {
  features {}
}
resource "azurerm_resource_group" "sig" {
  location = var.location
  name     = "rg-${var.prefix}-sig"
}
# Created Shared Image Gallery
resource "azurerm_shared_image_gallery" "sig" {
  name                = "sig${var.prefix}"
  resource_group_name = azurerm_resource_group.sig.name
  location            = azurerm_resource_group.sig.location
  description         = "Shared images and things."

  tags = {
    Environment = "prd"
    Tech        = "Terraform"
  }
}

resource "azurerm_shared_image" "sig" {
  name                = "wvd-image"
  gallery_name        = azurerm_shared_image_gallery.sig.name
  resource_group_name = azurerm_resource_group.sig.name
  location            = azurerm_resource_group.sig.location
  os_type             = "Windows"

  identifier {
    publisher = "MicrosoftWindowsDesktop"
    offer     = "office-365"
    sku       = "20h2-evd-o365pp"
  }
}
Deploy AVD modules using Visual Studio Code
Now we have the Terraform files build we can start deploying them to Azure. I create a main.tf file in my Terraform folder “Terraform\main.tf” where i can mention all my modules that I want to deploy.
provider "azurerm" {
  features {}
}
module "avd-hostpool"{
    source = "./modules/avd-hostpool"

}
module "avd-storage" {
    source = "./modules/avd-storage"

}
module "sig"{
    source = "./modules/avd-aib"
}
The first step is to login to Azure with the command “az login”. Your default subscription will be used to deploy resources. If you want to change this use the following command.
az account set –subscription “subscription id”
To deploy Azure resources with Terraform you need to prepare the code. The first code we need is “terraform init”

The second command is “terraform plan”. When using this code Terraform will go through your code and validate it and show you what will be deployed.
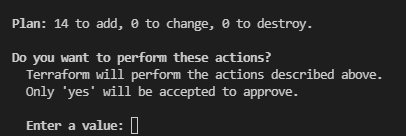
The final command that you need is “terraform apply”. This will show you again what will be deployed and asked you to confirm this by typing “yes”. If you don’t want this extra step you need to type “terraform apply -auto-approve” and the confirmation step is skipped.
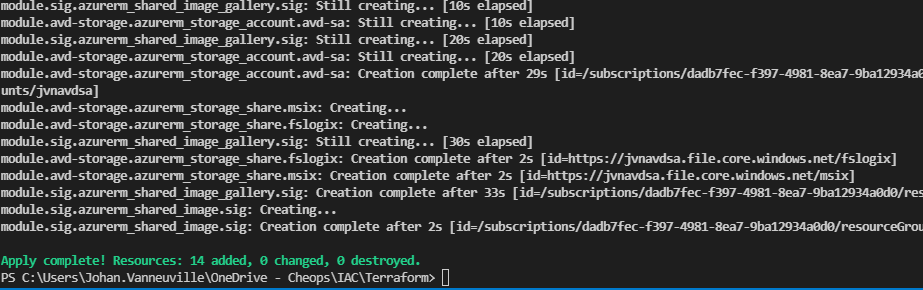
After the deployment is finished you will see this
After the deployment I can see the following resources groups in the Azure portal with all the resources


All the code I’ve created can be found on my Github page. In Part 2 I’ll cover the deployment using a DevOps pipeline.
it have been some changes (more details https://github.com/hashicorp/terraform/issues/30322 ) and you now have to use virtual_desktop_host_pool_registration_info resource instead of “registration_info”
https://registry.terraform.io/providers/hashicorp/azurerm/latest/docs/resources/virtual_desktop_host_pool_registration_info
MS
Yes, I’m writing a blog about it